Friday, April 29, 2011
string query = "Insert Into tests (tests) Values (@tests);" +
"Select @@Identity";
using (SqlConnection conn = new SqlConnection(connStr))
{
using (SqlCommand cmd = new SqlCommand(query, conn))
{
cmd.Parameters.AddWithValue("@tests", "tests");
conn.Open();
//cmd.ExecuteScalar();
int Idd;
Idd = Convert.ToInt32(cmd.ExecuteScalar());
lblMessage.Text = "ggggggggg" + Idd;
}
}
Labels: C#
Thursday, April 28, 2011
25+ jQuery Plugins that enhance and beautify HTML form elements
0 comments Posted by Duc Nguyen at 6:16 PMFrustrated with the form elements inconsistency among different browsers? With these jQuery plugins, you can unified the look and feel of all your form elements.
Form Validation
It's always good to have client side form validation. These jQuery plugin will save your times and works by reusing already made form validation.
Masking
Masking can help to avoid human mistake. I found these plugins are very helpful to guide users and decrease the chances of bad data.
File Uploader
These file uploader transform the orginal input file element into a more robust file uploader that able to upload multiple files and having a progress bar to indicate the upload progress.
Checkbox & Radio Button
Spice it up your checkbox and radio button with these jQuery plugins!
Spin Button & Slider
Spin button can be useful sometimes. The other alternative will be a slider.
Auto Complete
You must have seen the auto complete functionality from Apple.com, google.com and all the major websites. With the following plugins, we, too can implement it in our websites easily.
Calendar & Time picker
The old school method to let user select date and time are using drop down lists (day, month and year). Now, we can use a calendar, timepicker to replace the old way. Since it's picked from calendar, it decreases the chances of invalid date. I like them.
Drop Down Menu (Select Element)
Want to do more with drop down menu? These plugins able to add more capabilities to drop down menu.
Color Picker
If you are building some online tools that involves colours, I guess you will like the following plugins. jQuery based colour pickers!
Textarea
Sometimes, we get really annoyed when we have to type in message in such a small space (a textarea), and we have to scroll up and down, left and right (sometimes) to read the entire message. Say no more to scrolling! Add this autogrow/resizer capability to textarea to avoid that.
Conclusion
All the plugins are implemented using jQuery, there are still heaps of them out there. Of course, you might able to find other good stuff which are not made from jQuery. If you wrote jQuery plugin that enhances form, and you think it's really cool. Drop me a comment, I will add it inLabels: css
Monday, April 25, 2011
To refresh your page you may use the javascript function:
window.location.reload();
For example you can use that on the OnClientClick attribute of an ASP.NET button:
<asp:button ID="btnRefresh" OnClick="btnRefresh_Click" runat="server" Text="REFRESH"
OnClientClick="window.location.reload();" />
The code above will work fine, but if let's say you have some other server-side logic you want to run on the code for btnRefresh_Click, it won't be executed because the page would already be refreshed by then.
So to run your server-side code, first remove the OnClientClick attribute on the asp button tag above. Then place the following code inside your button click event:
protected void btnRefresh_Click(object sender, EventArgs e)
{
//Your logic here...
Page.Response.Redirect(HttpContext.Current.Request.Url.ToString(), true);
}
Labels: C#
Saturday, April 23, 2011
1, Make sure add here:
< httpHandlers >
< add verb="*" path="ofc_handler.ofc" type="OpenFlashChart.WebHandler.ofcHandler, OpenFlashChart"/ >
< /httpHandlers >
2, Make sure add:httpHandlers Element (ASP.NET Settings Schema)
Go to IIS 7, Add path="ofc_handler.aspx" type="OpenFlashChart.WebHandler.ofcHandler, OpenFlashChart" in Managed Handler.
see more help: http://msdn.microsoft.com/en-us/library/bb515343.aspx
Labels: OpenFlashChart
Friday, April 22, 2011
decimal Total = 0M;
    int totalItems = 0;
    decimal percent = 0M;
    protected void GridView2_RowDataBound(object sender, GridViewRowEventArgs e)
    {
        if (e.Row.RowType == DataControlRowType.DataRow)
        {
            Label markLabel = (Label)e.Row.FindControl("markLabel");
            int mark = Convert.ToInt32(markLabel.Text);
            Total += mark;
            totalItems += 1;
        }
        if (e.Row.RowType == DataControlRowType.Footer)
        {
            Label totalLabel = (Label)e.Row.FindControl("totalLabel");
            totalLabel.Text = Total.ToString();
        }
    }
    protected void GridView2_DataBound(object sender, EventArgs e)
    {
        foreach (GridViewRow row in GridView2.Rows)
        {
            Label markLabel = (Label)row.FindControl("markLabel");
            int mark = Convert.ToInt32(markLabel.Text);
            percent = (mark / Total) * 100;
            Label percentLabel = (Label)row.FindControl("percentLabel");

            if (percent == decimal.Truncate(percent)) // no decimal places, is a whole percent
            {
                percentLabel.Text = percent.ToString("N0") + "%";
            }
            else if (percent * 10 == decimal.Truncate(percent * 10)) // dealing with a one decimal place value
            {
                percentLabel.Text = percent.ToString("N1") + "%";
            }
            else if (percent * 100 == decimal.Truncate(percent * 100)) // two decimal place value
            {
                percentLabel.Text = percent.ToString("N2") + "%";
            }
            else
            {
                percentLabel.Text = percent.ToString() + "%"; // this is the 3 decimal place representation
            }
        }
    }
Labels: C#
Wednesday, April 20, 2011
Introduction
Last time, I wrote an article show how to enable remote connection on SQL Server 2005 Express. Now SQL Server 2008 Express is released for a while, it doesn’t allow remote connection on default installation as on SQL Server 2005 Express. So you have to enable it manually.
If you’re trying to connect to SQL Server 2008 Express remotely without enable remote connection first, you may see these error messages:
- “Cannot connect to SQL-Server-Instance-Name
An error has occurred while establishing a connection to the server. When connecting to SQL Server 2005, this failure may be caused by the fact that under the default settings SQL Server does not allow remote connections. (provider: SQL Network Interfaces, error: 28 – Server doesn’t support requested protocol) (Microsoft SQL Server)”
- “Cannot connect to SQL-Server-Instance-Name
An error has occurred while establishing a connection to the server. When connecting to SQL Server 2005, this failure may be caused by the fact that under the default settings SQL Server does not allow remote connections. (provider: SQL Network Interfaces, error: 26 – Error Locating Server/Instance Specified) (Microsoft SQL Server)”
- “Cannot connect to SQL-Server-Instance-Name
Login failed for user ‘username‘. (Microsoft SQL Server, Error: 18456)”
To enable remote connection on SQL Server 2008 Express, see the step below:
- Start SQL Server Browser service if it’s not started yet. SQL Server Browser listens for incoming requests for Microsoft SQL Server resources and provides information about SQL Server instances installed on the computer.
- Enable TCP/IP protocol for SQL Server 2008 Express to accept remote connection.
- (Optional) Change Server Authentication to SQL Server and Windows Authentication. By default, SQL Server 2008 Express allows only Windows Authentication mode so you can connect to the SQL Server with current user log-on credential. If you want to specify user for connect to the SQL Server, you have to change Server Authentication to SQL Server and Windows Authentication.
Note: In SQL Server 2008 Express, there isn’t SQL Server Surface Area Configuration so you have to configure from SQL Server Configuration Manager instead.
Step-by-step
- Open SQL Server Configuration Manager. Click Start -> Programs -> Microsoft SQL Server 2008 -> Configuration Tools -> SQL Server Configuration Manager.

- On SQL Server Configuration Manager, select SQL Server Services on the left window. If the state on SQL Server Browser is not running, you have to configure and start the service. Otherwise, you can skip to step 6.

- Double-click on SQL Server Browser, the Properties window will show up. Set the account for start SQL Server Browser Service. In this example, I set to Local Service account.

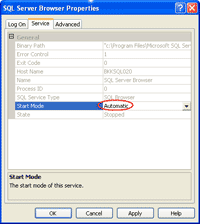
- On SQL Server Browser Properties, move to Service tab and change Start Mode to Automatic. Therefore, the service will be start automatically when the computer starts. Click OK to apply changes.
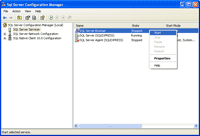
- Back to SQL Server Configuration Manager, right-click on SQL Server Bowser on the right window and select Start to start the service.
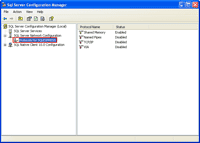
- On the left window, expand SQL Server Network Configuration -> Protocols for SQLEXPRESS. You see that TCP/IP protocol status is disabled.
- Right-click on TCP/IP and select Enable to enable the protocol.
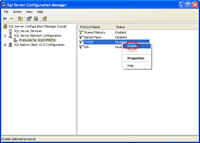
- There is a pop-up shown up that you have to restart the SQL Service to apply changes.

- On the left window, select SQL Server Services. Select SQL Server (SQLEXPRESS) on the right window -> click Restart. The SQL Server service will be restarted.
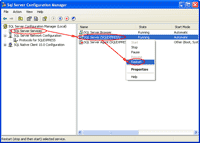
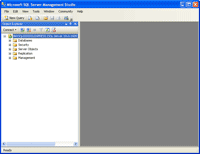
- Open Microsoft SQL Server Management Studio and connect to the SQL Server 2008 Express.
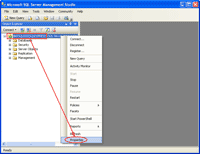
- Right-click on the SQL Server Instance and select Properties.
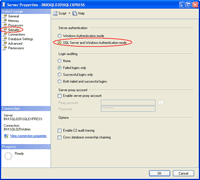
- On Server Properties, select Security on the left window. Then, select SQL Server and Windows Authentication mode.
- Again, there is a pop-up shown up that you have to restart the SQL Service to apply changes.

- Right-click on the SQL Server Instance and select Restart.
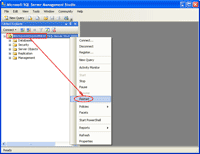
- That’s it. Now you should be able to connect to the SQL Server 2008 Express remotely.
Labels: SQL Server 2008 Express
public static IDictionary
{ "Phone", new Regex("^[2-9]\\d{2}-\\d{3}-\\d{4}$")},
{ "Email", new Regex(@"^(([^<>()[\]\\.,;:\s@\""]+"
+ @"(\.[^<>()[\]\\.,;:\s@\""]+)*)|(\"".+\""))@"
+ @"((\[[0-9]{1,3}\.[0-9]{1,3}\.[0-9]{1,3}"
+ @"\.[0-9]{1,3}\])|(([a-zA-Z\-0-9]+\.)+"
+ @"[a-zA-Z]{2,}))$"
)},
{ "URL", new Regex(@"(http(s)?://)?([\w-]+\.)+[\w-]+(/[\w- ;,./?%&=]*)?")},
{ "ZipCode", new Regex("^[0-9]{5}$")}
};
public static bool IsPhoneValid(string phone)
{
return RegexDictionary["Phone"].IsMatch(phone);
}
public static bool IsEmailValid(string email)
{
return RegexDictionary["Email"].IsMatch(email);
}
public static bool IsURLValid(string url)
{
return RegexDictionary["URL"].IsMatch(url);
}
public static bool IsZipCodeValid(string url)
{
return RegexDictionary["ZipCode"].IsMatch(url);
}
Labels: C#
Tuesday, April 19, 2011
In this post I’m going to show you how to embed a picture to body of the message in Gmail without attaching. To get this work done you have to enable Image Inserting in Google Labs. Let’s see how we can enable this.
First log in to your account and go to Settings as following picture;
Then go to Labs section and there you can find Inserting Images. Enable the feature and save the settings. See the following screen shots to more clarifications.
Now you can see new icon in tool bar, using that we can embed images to body of the message as following picture.
This is a simple thing that most people dose not aware
Labels: gmail


